
Lip blushing is one of the biggest beauty trends in recent years, combining artistry and precision to enhance natural lips with color and definition that lasts. If you’ve ever wished to wake up with perfectly tinted lips and no need for lipstick, this treatment might be for you.
This guide covers everything you need to know about lip blushing — what it is, what happens during the procedure, the complete healing process, aftercare tips, before and after results, and how to care for your lips during the first week.
What Is Lip Blushing
Lip blushing is a semi-permanent cosmetic tattoo that enhances your natural lip color, shape, and symmetry. It involves depositing pigment into the skin using a small tattooing device with fine needles. The goal isn’t to create a bold, lipstick-like look, but rather to give the lips a natural tint and soft definition.
The pigment color is custom-mixed to complement your skin tone and natural lip shade. Once healed, the results appear like a subtle wash of color — giving your lips that healthy, “just bitten” glow.
Lip blushing doesn’t add physical volume like fillers, but it can make the lips look fuller by improving definition and tone. It’s ideal for those who want to enhance pale or uneven lips, correct discoloration, or reduce dependence on daily makeup.
Benefits of Lip Blushing
Lip blushing offers more than just color enhancement. It delivers long-term convenience and confidence.
- Enhances the natural tone and symmetry of the lips
- Adds definition to the lip border and cupid’s bow
- Corrects uneven pigmentation or dark areas
- Creates the illusion of fuller lips without filler
- Reduces the need for daily lipstick or liner
- Lasts up to two or three years with proper care
It’s especially popular with people who want a polished, low-maintenance look or have naturally pale lips that tend to blend into their skin tone.
Preparing for a Lip Blushing Appointment
Proper preparation ensures smoother healing and longer-lasting results. Begin by choosing a certified and experienced artist who specializes in permanent makeup. Review their healed results — not just freshly done photos — to see how their work holds up over time.
Before your appointment, focus on lip care. Keep your lips hydrated for several days leading up to the treatment. Avoid using exfoliating acids or harsh scrubs that can irritate the skin. On the day before and day of the procedure, avoid alcohol, caffeine, and blood thinners to reduce the risk of bleeding or bruising.
If you’re prone to cold sores, talk to your doctor about taking antiviral medication before your appointment. The trauma from tattooing can sometimes trigger an outbreak.
Arrive at your appointment with clean, makeup-free lips.
The Lip Blushing Procedure
The procedure generally takes between two and three hours from start to finish. It begins with a consultation to discuss your goals, ideal color, and desired shape. The artist then applies a numbing cream to minimize discomfort. Most clients describe the sensation as a light vibration or scratching feeling rather than pain.
Once your lips are numb, the artist outlines and maps your lip shape to ensure symmetry. Using a fine needle, the pigment is gently implanted in layers to build color and even coverage. The artist works slowly and carefully to avoid damaging the delicate lip skin.
After pigment application, your lips may appear swollen, tender, and darker than expected. This intense color will gradually fade during healing. You’ll receive detailed aftercare instructions to help your lips recover properly and retain pigment evenly.
The Lip Blush Healing Process
Healing is a crucial part of the lip blushing journey. Understanding what happens each day helps you stay patient and confident as your lips go through visible changes.
Days One to Two:
Right after the treatment, your lips will look very bright, bold, and slightly swollen. The color appears much darker than your final result because the pigment is fresh and the skin is healing. Your lips may feel tight or tender. Keep them clean and lightly moisturized with the balm your artist provides. Avoid spicy or hot foods, and don’t touch or rub your lips.
Days Three to Four:
Peeling begins. The top layer of your lips starts to flake as the skin renews itself. This stage can make your lips look patchy, faded, or uneven. Resist the urge to pick or peel, as this can cause pigment loss or scarring. Continue to apply healing balm as instructed and let the skin shed naturally.
Days Five to Seven:
By the end of the first week, peeling should be nearly complete. The lips will feel softer and more comfortable. The initial bold color will fade significantly, revealing a lighter, natural tone. Don’t worry if the color looks too pale — this is normal. The pigment continues to settle beneath the skin over the next few weeks.
Weeks Two to Four:
During this stage, the pigment resurfaces and stabilizes. Your lips begin to show their true shade and shape. The color softens and looks more even. At this point, you can resume normal activities and use gentle lip products again.
Weeks Four to Six:
The healing process is complete, and your lips have reached their final look. The pigment is settled and even. If needed, a touch-up session can refine the color or shape.
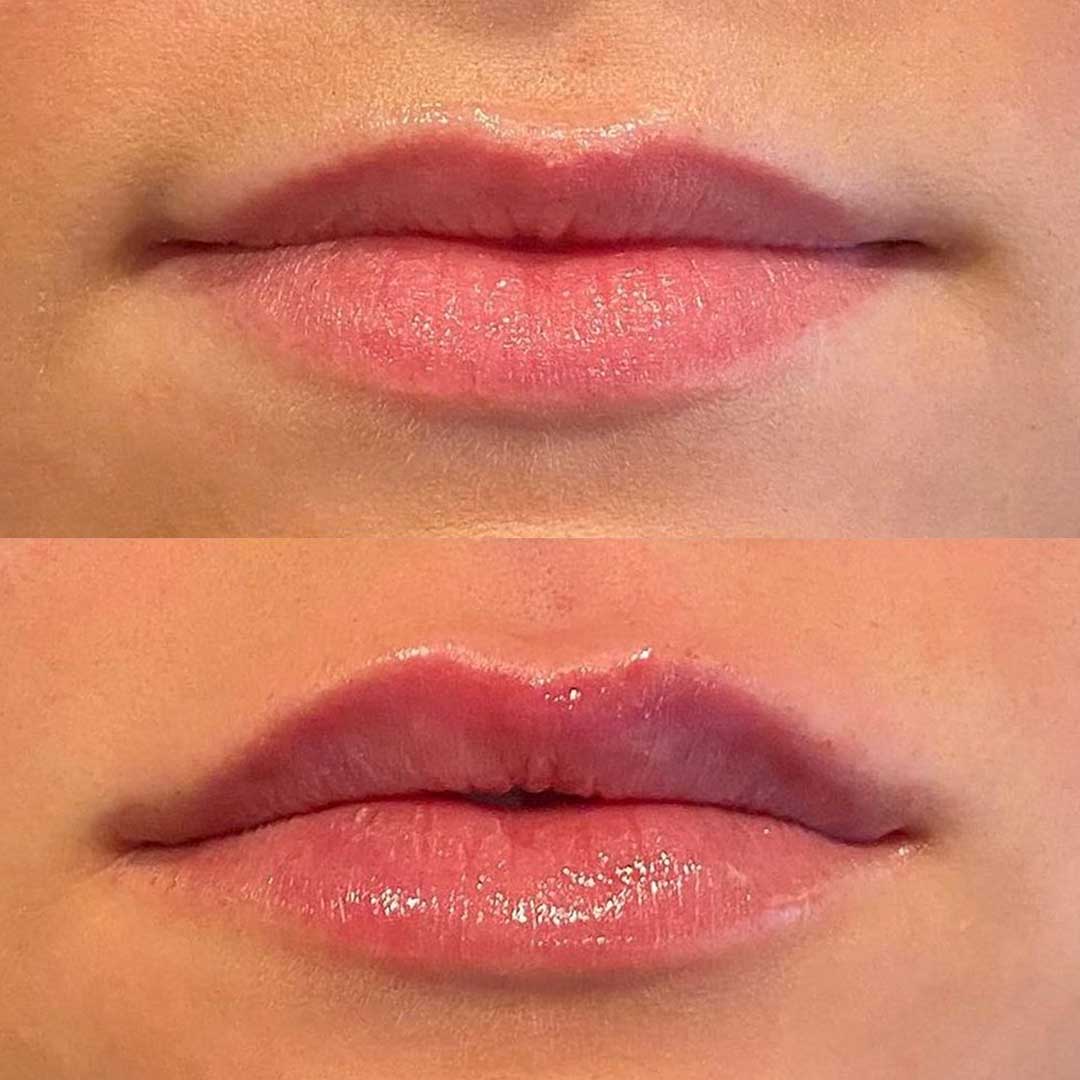
Lip Blushing Before and After
The transformation from before to after lip blushing can be subtle yet striking.
Before:
Lips might appear pale, uneven, or lacking definition. Some people have darker edges or cool undertones that make lips look dull.
Immediately After:
The lips are vibrant, highly pigmented, and slightly swollen. The color can look intense, but this fades significantly within a week.
After One Week:
Most of the peeling has stopped, and the lips appear soft, smooth, and naturally tinted. Swelling is gone, and comfort returns.
After Four to Six Weeks:
The final healed look appears. The lips look naturally enhanced, evenly colored, and perfectly defined. The shade is softer and more natural than right after treatment, leaving a delicate, tinted finish that mimics the look of tinted balm.
Lip Blushing Aftercare
How you care for your lips after the procedure determines how well your pigment heals and how long your color lasts. Follow your artist’s aftercare routine closely.
What To Do:
- Keep lips moisturized with the healing balm provided.
- Blot away any lymph fluid gently with a clean tissue.
- Drink plenty of water and avoid excessive lip movement.
- Use a straw for the first few days when drinking beverages.
- Apply sunscreen to your lips once they are fully healed to protect color.
What To Avoid:
- Do not pick or peel the lips while they flake.
- Avoid lipstick, gloss, or tinted balm until peeling is complete.
- Stay away from hot, spicy, or salty foods that may irritate healing skin.
- Avoid swimming, saunas, or heavy sweating for the first week.
- Do not expose your lips to direct sunlight or tanning beds during healing.
The first seven days are critical for proper healing. Once the skin stops peeling, you can slowly return to your normal lip care routine.
One-Week Update
After a week, your lips will feel soft, smooth, and comfortable. The peeling phase is over, and the color has lightened significantly. This is when many people start to see the beauty of the natural tint developing.
At this stage, continue to keep your lips moisturized. Even though they look healed on the surface, the deeper layers are still stabilizing pigment. The final color will appear more even and natural by week four.
If you notice uneven spots or light areas, don’t worry — this is normal before your touch-up session. The second session ensures balance and long-lasting results.
Lip Blushing Longevity and Maintenance
Lip blushing results can last from one to three years, depending on skin type, lifestyle, and pigment retention. Sun exposure, frequent exfoliation, and smoking can cause color to fade faster.
To maintain your look, schedule a refresh session every 12 to 18 months. This keeps the color vibrant and prevents fading. Using an SPF lip balm daily also helps prolong the pigment.
Lip Blushing Cost
The price of lip blushing varies depending on your artist’s experience and location. On average, the treatment costs between $400 and $800, with touch-ups ranging from $100 to $250.
While cheaper options may be tempting, always prioritize skill and hygiene. A trained professional ensures proper pigment placement and reduces the risk of complications.
Lip Blushing Pros and Cons
Like any cosmetic treatment, lip blushing has both advantages and considerations.
Pros:
- Creates a natural tint and defined lip shape
- Saves time on daily makeup
- Boosts confidence and appearance
- Customizable color options
- Long-lasting results with minimal upkeep
Cons:
- Requires healing and patience
- May trigger cold sores in sensitive clients
- Color fades over time and needs maintenance
- Not ideal for those seeking dramatic color change
- Slight discomfort during the procedure
Most people find the results well worth the brief healing process. The subtle color boost enhances your natural beauty without looking overdone.
Who Should Avoid Lip Blushing
Lip blushing may not be suitable for everyone. Those with active cold sores, skin infections, severe allergies, or certain medical conditions should consult a professional before booking. Pregnant or breastfeeding individuals should postpone treatment.
Always disclose medications and health history to your artist during consultation. Safety and proper healing should always come first.
Frequently Asked Questions
Does lip blushing hurt?
A numbing cream is applied before the procedure. Most people describe it as mild discomfort rather than pain — similar to light scratching.
How long does lip blushing take to heal?
The visible healing process lasts about seven to ten days. Complete pigment stabilization and final color appear after four to six weeks.
How long do results last?
With good care, results can last one to three years before needing a touch-up.
Can I get lip filler and lip blushing?
Yes, but spacing treatments by at least two weeks is recommended. Allow fillers to settle before tattooing for the best results.
When can I wear lipstick again?
Wait until the peeling phase is over — usually around day seven to ten — before applying any makeup to your lips.
Are there any risks?
Minor swelling, tenderness, and dryness are common. Infection or uneven color can occur if aftercare isn’t followed correctly.
Can lip blushing correct dark or cool-toned lips?
Yes. Artists often use a technique called lip neutralization to balance deeper tones before adding your chosen shade.
Final Thoughts
Lip blushing offers a beautiful, long-lasting way to enhance your lips with minimal effort. It adds a touch of natural color, refines shape, and creates the illusion of fuller lips — all while keeping your look effortlessly polished.
While the first week of healing can feel like a rollercoaster, patience pays off. As the pigment settles, you’ll be left with soft, evenly tinted lips that make every morning easier and every smile a little more confident.
If you’re looking for a semi-permanent beauty treatment that enhances your natural features, lip blushing is a gentle, modern solution that can completely transform your look without changing who you are.